Please ensure that you've completed the necessary steps in Preparing Your Unreal Project or Preparing Your Unity Project, before using the local streaming workflow.
Don’t forget that in addition to your packaged Windows game you’ll also need the following installed on your Windows machine:
- .NET Framework 4.8 Developer Pack
- Node.js (LTS version 18.x or earlier)
Create a Project in the PureWeb Console
You’ll need a projectId from the PureWeb console before you can begin testing locally.
Open your web browser and go to https://console.pureweb.io. Log into your account, and if you don’t already have a project, create one by clicking on the Create new project + in the header bar.

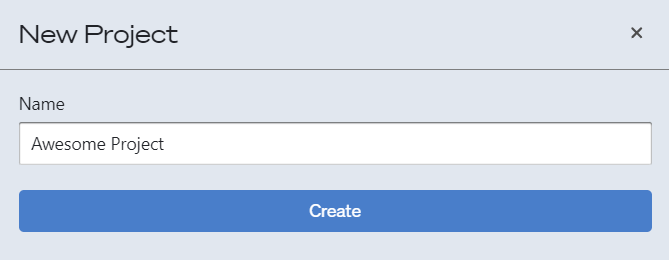
Give your project a name in the popup window and click “Create.” Your project should now show up in the dropdown list.

Configure the Platform Streaming Agent
The PureWeb platform streaming agent enables your game to communicate and stream through the PureWeb Platform. You’ll need to install the PureWeb Command Line Interface (CLI) and the PureWeb Streaming Agent.
In your command prompt, there are two command to run.
Using npm:
npm install -g @pureweb/platform-cli
npm install -g @pureweb/platform-streaming-agent
Using yarn:
yarn global add @pureweb/platform-cli
yarn global add @pureweb/platform-streaming-agent
Setup CLI credentials
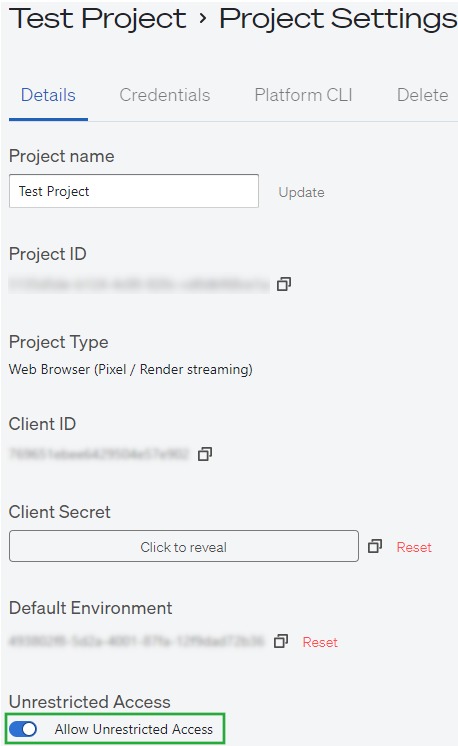
In the PureWeb console, click the gear icon from the top menu to access project properties.

- In the Details tab, enable "Allow Unrestricted Access" at the bottom.
- In the Platform CLI tab, copy each of the commands there and run them in your command prompt window.
NOTE: The above steps only need to be performed once. After doing so, you can begin your local testing with the next step below.
Create a Local Environment for Testing
You’ll use your local machine to emulate the streaming environment.
- In the PureWeb console, copy the Default Environment from the Project Properties dialog.
- In a command prompt window, use the cli to request an agent token with the following command, inserting the Default Environment value from the console:
pw agent create --environmentId <Default Environment>The command will return an output message that will include an access_token, needed in step 3.
pw agent create --environmentId

12345-6789-1234-5678-123456733212389
{
	"access_token": "ey...iw8rq2Wk",
    "expires_in": 86400,
    "token_type": "Bearer"
}
3. Set the PUREWEB_AGENT_TOKEN environment variable. This will vary between operating systems and shells.
- Windows PowerShell: $env:PUREWEB_AGENT_TOKEN="<access_token>"
- Windows Command: set PUREWEB_AGENT_TOKEN=<access_token>
- OSX / Linux Bash: export PUREWEB_AGENT_TOKEN=<access_token>
4. For Unity, set the default port to 9210 using the PUREWEB_STREAMER_PORT environment variable
(For Unreal, you can skip this step.)
//Windows PowerShell
$env:PUREWEB_STREAMER_PORT=9210

//Windows Command
set PUREWEB_STREAMER_PORT=9210

// OSX / Linux Bash
export PUREWEB_STREAMER_PORT=9210
Run the Streaming Agent
To stream your game locally you must start the streaming agent. In your first command prompt window start the streaming-agent.
streaming-agentThe output will look something like the below:
┌──────────────────────────────────────────────────────────┐
│                                                          │
│   PureWeb Streaming Agent 2.2.1                          │
│                                                          │
│   Agent id:       e5b1b35a-c60b-45fb-89a4-dd2788620644   │
│   Project id:     bea3c4cb-efa5-4041-9485-6e7a2b49e6d3   │
│   Environment id: 12345-6789-1234-5678-123456733212389   │
│                                                          │
│   Streamer Port:   8888                                  │
│   Leasing Enabled: NO                                    │
│   Sidecar Port:    NO                                    │
│                                                          │
│   Timeouts                                               │
│                                                          │
│     Rendezvous:    NO                                    │
│     Linger:        NO                                    │
│                                                          │
│                                                          │
└──────────────────────────────────────────────────────────┘
Note: If you are using this workflow with an Unreal 4.27 game, don't forget to add the version when starting the streaming agent in your command window.
streaming-agent --unrealEngineVersion=4.27Stream, View and Share Your Game
With the local streaming agent running you’re almost finished!
In a second command prompt window, navigate to the folder with your packaged game executable and start the game with local streaming enabled.
//Unreal Engine 5+
game.exe -PixelStreamingPort=8888 -PixelStreamingIP=127.0.0.1 -renderOffscreen

//Unreal Engine 4.27
game.exe -PixelStreamingIP=localhost -PixelStreamingPort=8888 -AllowPixelStreamingCommands -PixelStreamingWebRTCDisableResolutionChange=false -ExecCmds="PixelStreaming.WebRTC.DisableResolutionChange" false

//Unity
game.exe
Note: The "renderOffscreen" option for Unreal will run the process headless. The advantage is that you will see the stream in the web browser only, but keep in mind that you need to use the Windows Task Manager to stop the UE process when needed.
PureWeb Preview Client
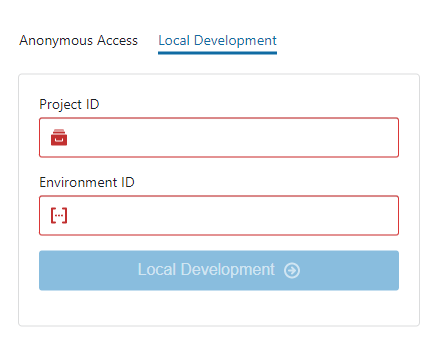
While your game is running, you can use a web browser to launch a local streaming session at this point from our preview client. In your web browser, go to preview.pureweb.io:
- Click the Local Workflow tab
- Enter the projectId and environmentId
- Click the "Local Development" button

Local Custom Web Client
Steps to follow:
- Start the local web development server:
- Open a 3rd Command Prompt
- Enter the following command to run the local web development server
npm start2. The above code will now automatically open a new tab in your default browser.
- Modify the URL in the new tab to include the correct port number and your specific environment ID. Please use the format:
http://localhost:4000/?environmentId=environment Id&launchType=local
(replace environment ID with your value in the link above; prerequisite to run the web client template locally)
3. Test the Local Stream as you should now be able to stream locally using your web client.
If you're using Unity and find yourself unable to interact with the stream in your browser, please refer to this article for why that might be happening.
Finishing Up
To stop streaming your game:
- Press CTRL+C in the command prompt window running the streaming agent.
- Close the game window to exit the game.
Next Steps
After you’ve ensured your game package is optimized and ready, you’ll want to share it with your customers / guests!
References:

