This is part 2 of the "Web client communication to Unreal and back" series.
You will need to have read and understood the steps in Test streaming your project locally before proceeding.
For ease of explanation, we have created a new project in the PureWeb Reality console and have started a new empty Unreal game project. We will be putting our logic into the default level’s Level Blueprint.
Send Info to the Game from Our Button
We are going to move a bit of the functionality from our button into a new function. The icon will still toggle back and forth between ON and OFF, but we will also be able to generate a message and send it to the game to be processed there.
Some of this section has been adapted from the Unreal documentation at the following link, and customized for this specific example.

In your web client’s App.tsx file, change the onClick handler for the toggle button to
onClick={() => sendLightInfoToGame()}Of course this will not work because we haven’t defined the sendLightInfoToGame function yet. Underneath the declaration for lightIsOn, define the function like so:
function sendLightInfoToGame(){
	//flip the state of lightIsOn
	//ie: if the icon was on (TRUE) we'll turn if off (FALSE)
	toggleLight(!lightIsOn);

	//send a message to the game about the light
	props.InputEmitter.EmitUIInteraction("changeLightState");
}
The props.InputEmitter is part of the interface defined in the web client template, and allows us to send information into the game through the PureWeb PixelStreaming plugin.
In this case, we are sending a simple string, but you can send JSON if needed to bundle more complex information from your client to be processed in the game.
Listen For Info From the Web Client in Unreal
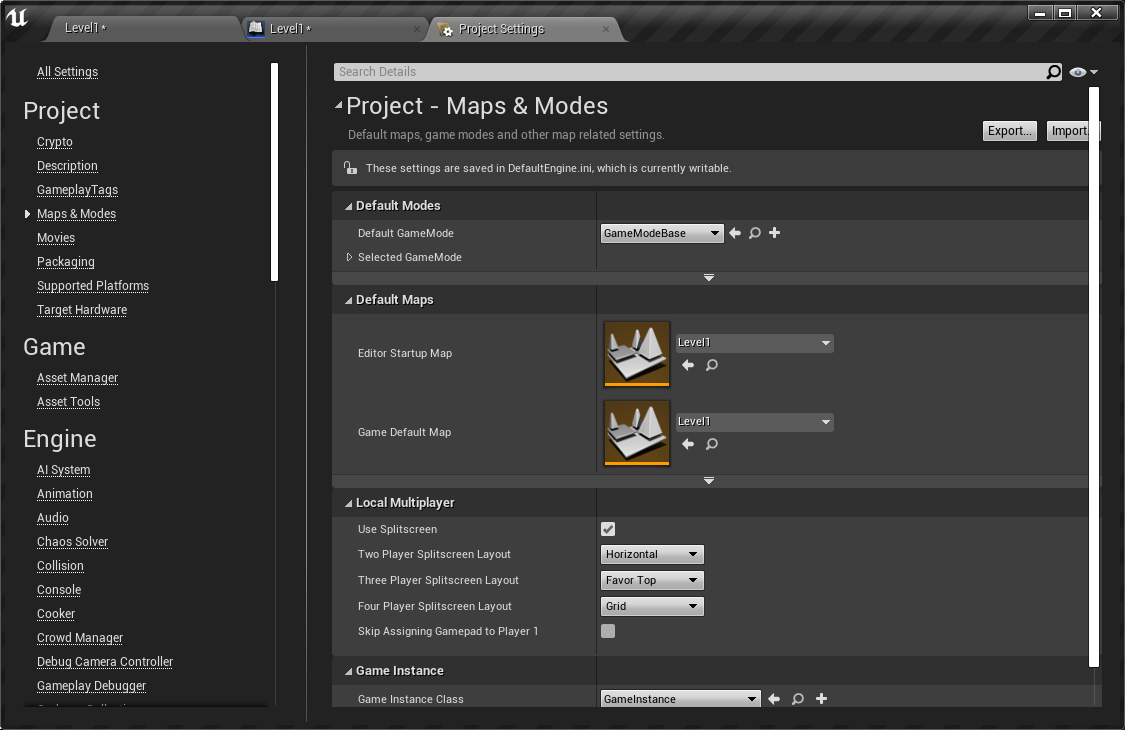
In our Unreal project, we have a basic level simply named “Level1.” Whichever level you decide to use in your game, make sure you set that level to be “Game Default Map” in the Project Settings. This can be found under Edit \ Project Settings, in the Project \ Maps & Modes tab.
The emitUIInteraction from the web client sends the input string to the Pixel Streaming plugin in the game, which then raises an event on the input controller. In your application's gameplay logic, you can bind your own custom event to handle these inputs, using the Bind Event to OnPixelStreamingInputEvent node.
You only need to bind this event once, typically at the start of your game. Each time our web client calls the emitUIInteraction function, the custom event is automatically invoked, regardless of the input passed to emitUIInteraction. We’ll set this up and define some logic to make use of the input.
Open the level editor to view Level1 (or whatever level you will be working with), then open the Level Blueprint (switch to the Event Graph if it doesn’t open by default).
- If you don’t have one, add a node for “Event BeginPlay”
- Add a function node for “Get Player Controller”
- Drag from the Return Value pin of the Get Player Controller node, and create a new function “Get Component by Class” node.
- Change the “Actor Component” under the component class to “PixelStreamerInputComponent”
- Add a Custom Event node; ours will be named “webClient_LightToggle”
- Drag the Return Value from the “GetComponentsByClass” out to create a “Bind Event to On Input Event” node. Note → you may have to uncheck “Context Sensitive” in the popup to find this under the Pixel Streaming Input section.
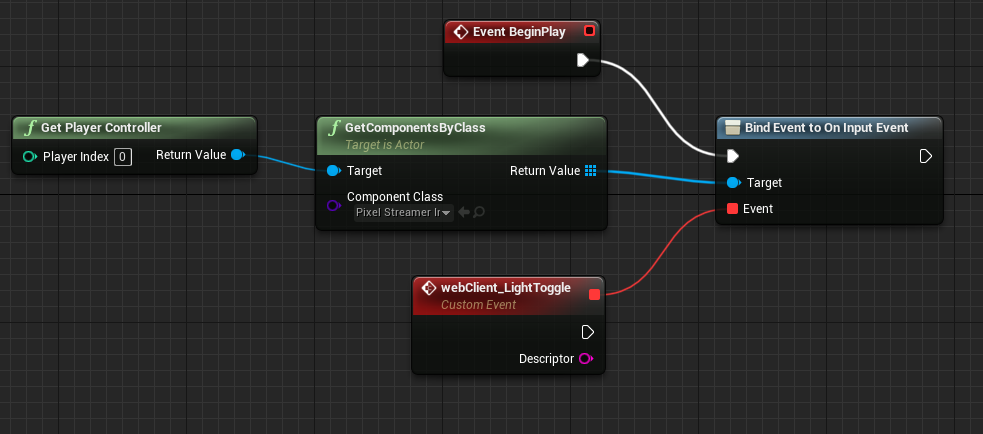
- Connect the white arrow output from the Event BeginPlay node to the Bind Event node.
- Connect the red square output from the webClient_LightToggle node to the Event input on the Bind Event node.
Your graph should look like this:
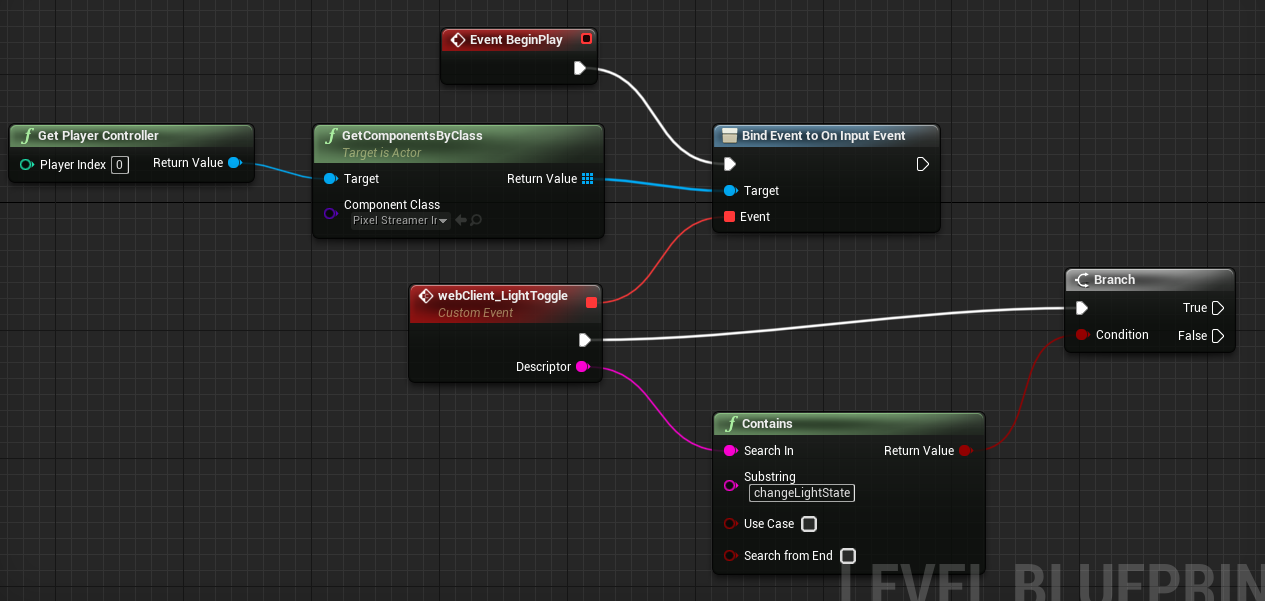
The custom event you assign has an output named Descriptor, which you can use to retrieve the string that was sent to your game by the emitUIInteraction function. The button created in the web client sends the string “changeLightState“ which is what we want to watch for in our Blueprint.
- On the webClient_LightToggle node, drag from the Descriptor pin and create a “Contains” function node. Enter “changeLightState” into the Substring field on the new node.
- Drag the Return Value out to create a “Branch” node. On the webClient_LightToggle node, drag the white output pin to the “Branch” node’s Input.
The Branch node’s outputs will tell us if the web client input contains the specified Substring. We are going to create a light in the scene, and by connecting the Branch node’s True output to the light’s visibility property it can be turned on and off.
Now we have our game ready to watch for input from the web client, and it knows WHAT to watch for...but we have not told it how to behave if that string arrives. Let’s set that up next.
Execute Game Behaviour on Web Client Input
Back in the level editor, create a spotlight in Level1. Edit the position, colour and intensity to your liking. Our spotlight is orange and positioned so that you can see it on the floor of Level1 when the game starts. It is named orangeSpotlight.
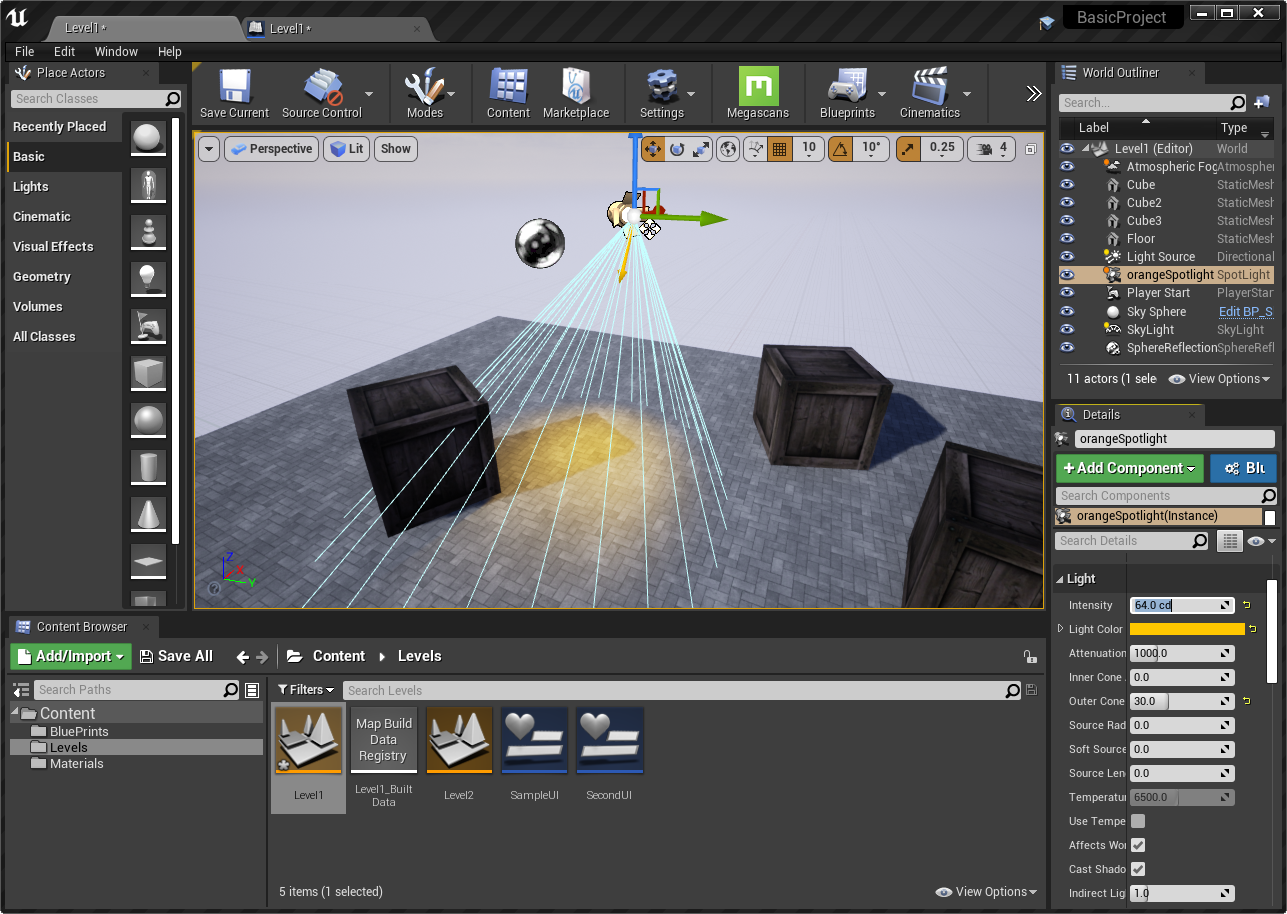
We want the light in the game to turn on or off when the web client button is clicked. Remember that in our web client the default state of our toggle button is OFF, so uncheck the visibility of your light in the game to match before proceeding.
You need to access the properties of the light from the level in the event graph. Open the Level Blueprint for Level1 in a separate window, and then, from the Level Editor window, click and drag the orangeSpotlight from the World Outliner tab into the Level1 graph. An orangeSpotlight node will appear in the event graph with a Target Spot Light Component node connected to its output.
There are three things we’ll need to do with the spotlight:
- Get the current state of its visibility property
- Be able to set the visibility to TRUE
- Be able to set the visibility to FALSE
The first one is easy. Drag out from the Target Spot Light Component node and connect a Get Visible node (under Rendering/Variables in the list). The output of this node will be TRUE or FALSE, based on the light’s visibility.
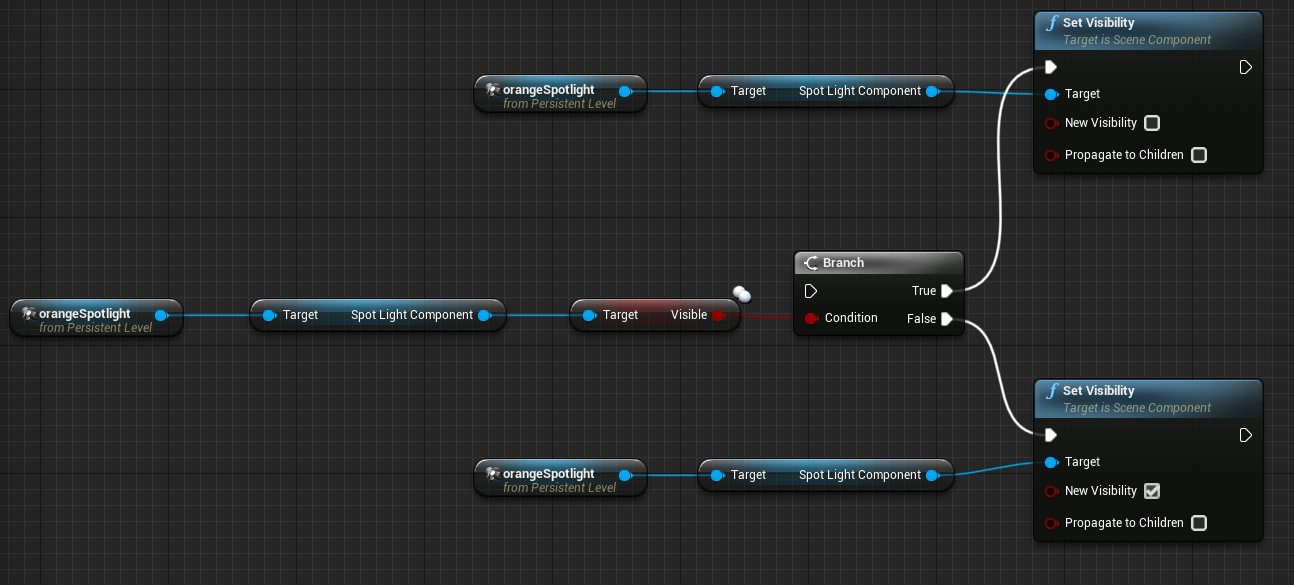
Copy and paste the orangeSpotlight and outgoing Target nodes twice. For one set of these create an output Set Visibility function node that is unchecked. For the other, create an output Set Visibility function node that is checked.
Finally, we will connect this part of the graph together with a simple Branch node.
Drag from the Target Visible node’s output and create a Branch node. For the TRUE condition of the new Branch node, connect it into the input of the unchecked Set Visibility node. Connect the FALSE output to the checked one.
You should have a new subgraph that looks like this:
One step left, the easiest one! Drag the TRUE output from the Branch node we created earlier (the one that checks for the “changeLightState” message from the web client) into the input of the Branch node above.
Compile, build, and package your game. Start the local streaming agent and load your built game package. When you connect your local web client you should be able to turn the spotlight on and off with the button, and the button changing state to match.
Well done, let's carry on with Part 3!